Gmail is a free email service developed by Google. Nowadays, many people use Gmail to send and receive emails. When you use Gmail for several years, you find that you can't manage the flood of emails in your inbox. In this situation, what can you do?
Generally speaking, we will use "Folders" to organize mail. However, Gmail has no folders, so how to create folders in Gmail? Instead, you can create labels and organize emails by category. Because emails can have many tags, so they are more efficient than regular folders. Just follow this article, and then you will know how to make folders in the email to keep your inbox organized.
Contents
Part 1 - How to Create Folders in Gmail 1. Create a New Folder with Upper Toolbar 2. Add a New Folder with Sidebar
Part 2 - How to Add Emails to your Folders
Part 3 - How to Delete Folders in Gmail
Part 4 - How to Manage the Folders in Gmail 1. Create Filter 2. Show or Hide the Folders
Part 1 - How to Create Folders in Gmail
Gmail is different from ordinary mailboxes. It does not use folders to classify and archive emails but instead uses a label-based classification method. The label-based classification method means that users can create labels according to their needs, and then each email can be assigned one or more labels so that users can click on each label in the label list like the way to use folder classification. With the two methods we provided below, you can more flexible and convenient to manage the mails.
1. Create a New Folder with Upper Toolbar
Step 1. Open Gmail and log into your account.
Step 2. Select the mail you want to add to the folder. You can select emails from your inbox, archive, or other locations. Click the checkbox to the left of an email to select it and then select the "Label" icon.
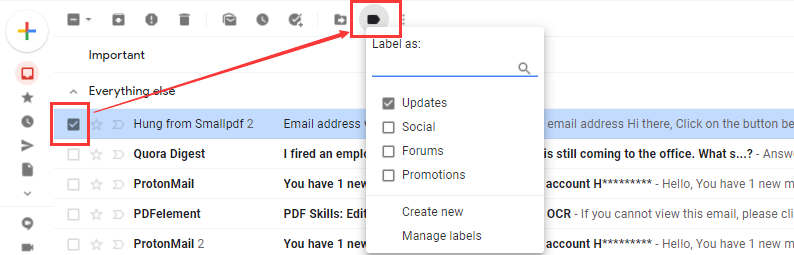
Step 3. Click the "Create new" button, a dialog box will appear on the screen, allowing you to create a new label. Meanwhile, you can also choose to add sub-labels under a certain label. This option is very useful if you need to organize a lot of mails.
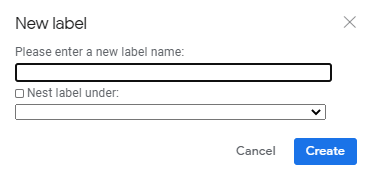
Step 4. Enter a name for your label. In the pop-up window "Please enter a new label name" text box, type whatever you want to name your label. If you want to nest the label under another existing label, check the "Nest label under" box and select the parent label from the drop-down menu.
Note
"The label name must be short, but descriptive so that you can know the classification of the mails inside."
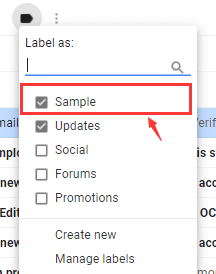
Step 5. Click the "Create" button. Then you can see the folder at the bottom of the pop-up window. Your label will be created.
Tip
"Gmail supports up to 5000 labels."
2. Add a New Folder with Sidebar
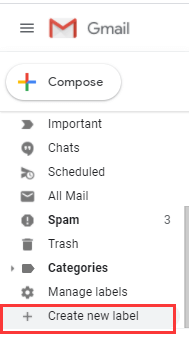
Step 1. Go to the left sidebar of your inbox. Swipe down the sidebar then you will see the option "Create new label". Click the option.
Step 2. Then it will show up a pop-up window. Enter a name for your label. Refer to steps 4-5 of the previous method then you can add a new folder successfully.
Part 2 - How to Add Emails to your Folders
When you create a folder successfully in Gmail, you need to move or add the emails into your folder. Just three steps for you to add the mails.
Step 1. Check the box to the left of an email to select it (do this with multiple emails if you want to add them all to the label).
Step 2. Then click the "Label" icon which shows on the toolbar.
Step 3. Click the label to which you want to move the email(s) in the resulting drop-down menu.
Part 3 - How to Delete Folders in Gmail
Step 1. Go to Gmail.
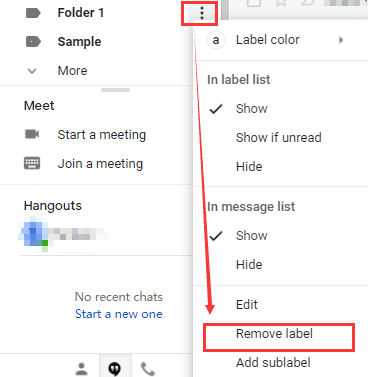
Step 2. On the left side of the page, hover over the label's name.
Step 3. Three vertical dots will appear next to the label name. Click on those dots and a menu of options appears. Click on the "Remove label" button to delete the folder.
Part 4 - How to Manage the Folders in Gmail
Managing email effectively is necessary. This section will explain how to use Gmail to improve the inbox workflow and save your time.
1. Create Filter
In daily life, we may all have received spam. But when we use Gmail, it can help you to filter a lot of spam. Gmail includes powerful filtering options that allow you to automatically perform a variety of different actions on incoming emails. At the same time, you can have incoming emails automatically categorized into specific folders without having to move each mail by yourself. Please follow the steps below to learn how to create a filter in Gmail.
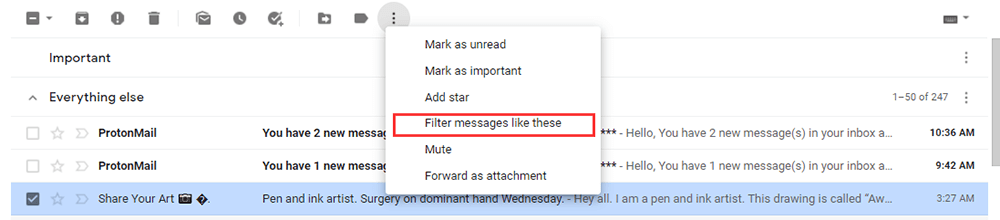
Step 1. Open Gmail. Choose the email that you want to filter future messages from.
Step 2. Then the vertical dots will appear on the toolbar. Click on those dots and a menu of options appears. Click the "Filter messages like these" option.
Step 3. Enter your filter criteria and then click the "Create filter" button.

Note
"When you create a filter to forward messages, only new messages will be affected. Additionally, when someone replies to a message you've filtered, the reply will only be filtered if it meets the same search criteria."
2. Show or Hide Labels
With Gmail, you can choose to hide tagged messages in your inbox so that your inbox will not be cluttered.
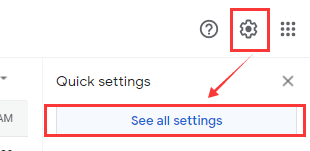
Step 1. Select the "Setting gear" icon in the upper-right corner of the screen. Then choose "See all setting".
Step 2. Choose the "Labels" option, select "show" or "hide" for each label in the list as you need.

Step 3. Close the Settings screen when you're done. All changes you make take effect immediately, so there's no need to save or confirm your updates.
FAQ
How to send large files via Gmail?
The max attachment size of Gmail is 25 MB. If your file is greater than 25 MB, you can read the "How to Send Large Files via Email" article to help you send the file.
Conclusion
After reading this post, we believe that you can know how to add a folder in Gmail and manage your mails freely. If you want to know more tips about Gmail, please contact us.
Was this article helpful? Thank you for your feedback!
YES Or NO
Recommended for you