Today people would pay much attention to the self-created content, to protect the copyright. As a result, more people would like to add a password to their Word document for keeping the content safe and would not be leaked easily. This is not a complicated task thanks to the provided function of Microsoft Word. So today, this blog will teach you how to lock a Word document on the desktop.
Part 1 - How to Password Protect A Word Document
To improve the security of the Word document content, the direct way we can do is to add a password to it. Now, based on different versions of Microsoft Word, I will show to the detailed guides to how to password protect a Word document easily.
Office 365, Word 2010/2013/2016 on Windows
The way to add a password to protect the Word document using Office 365 and Word 2010, 2013, 2016 versions are of high similarity. Just follow the steps below to do it now!
Step 1. Open the Word document on your desktop, and click the menu bar for going to "File" > "Protect Document".
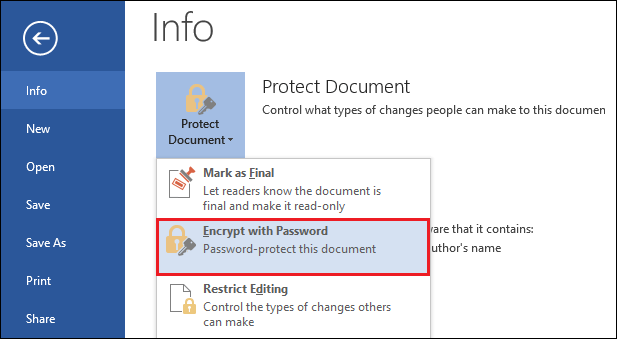
Step 2. Tap the "Encrypt with Password" option from the menu, then a window will pop up to let you enter the password you want to set for this document.
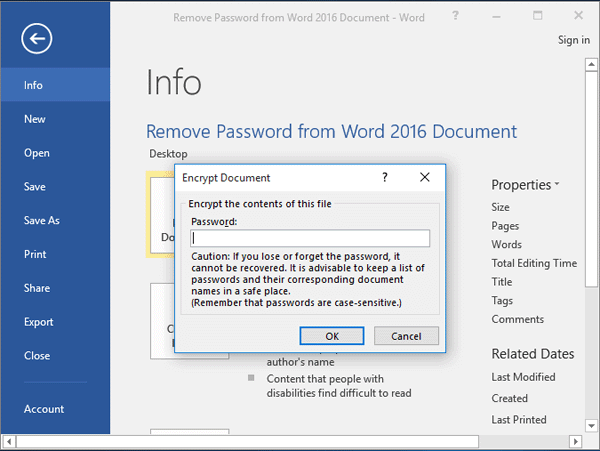
Step 3. Enter the password again for double-check whether you have made it right. Then just tap "OK" and also "Save", then the password will come into effect immediately.
Office 365, Word 2010/2013/2016 on Mac
Step 1. Click to open the Word document, which you want to add a password to on your Mac computer.
Step 2. Go to the section "Review" and select the "Protect Document" option. Then a "Password Protect" window will pop up.

Step 3. In the window, turn to the "Security" section and enter the password you need to set for the Word document. You can choose to add one while open the document, and also add another for those who want to modify the content.
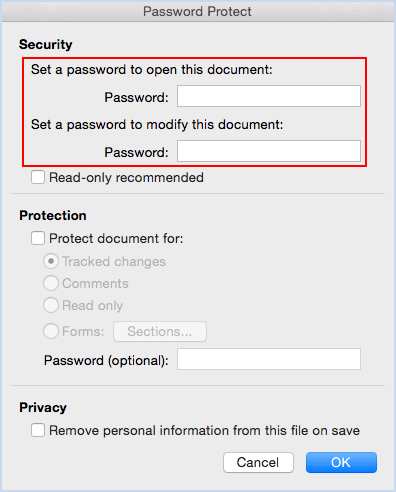
Step 4. When the password is well set now, directly press the "OK" button in the lower right and make the password take effect immediately.
Step 5. Likewise, the last step is to tab the "Save" button to update the password change to the Word document.
Word 2011 for Mac
The way to add a password to Word using Word 2011 on Mac would be different. But don't worry, the steps are also easy to understand. Just follow this tutorial to give a go!
Step 1. Just the same, the first step to start the operation is to open the Word document you need to add a password to.
Step 2. Then in the interface of the Word document, go to the "Word" menu and click the "Preferences" option. In the following, click "Personal Settings" > "Security".
Step 3. When you click the "Security" option, and there is a window called "Password to open". Now you can enter a password here, and click "OK" to submit.
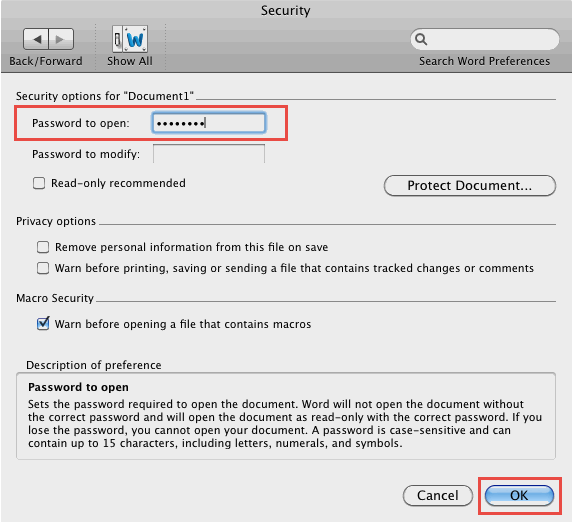
Step 4. Then also, a double-check "Confirm Password" box will pop up, just enter your password again and press "OK" to finish adding the password.
Step 5. Finally, remember to click "Save" so that the password will be in its effect.
Word 2007
Step 1. Also, let's open the Word document that you want to add a password to on your computer using Word 2007.
Step 2. Then click the Microsoft icon on the top left corner, and select "Save As".
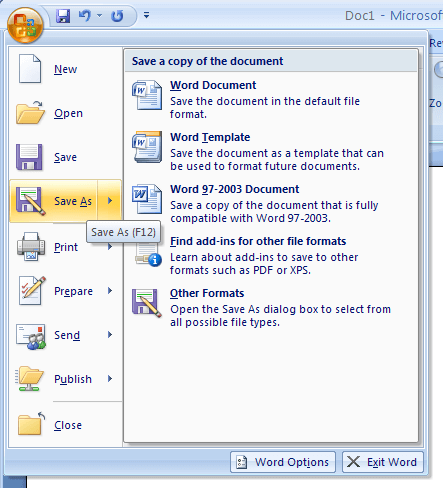
Step 3. Then in the window that pops up to let you choose a folder for saving, click "Tools" > "General Options...".
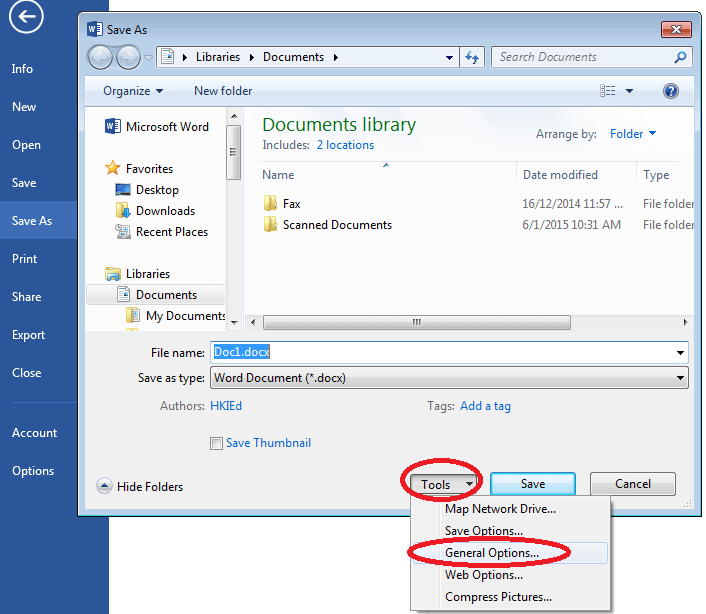
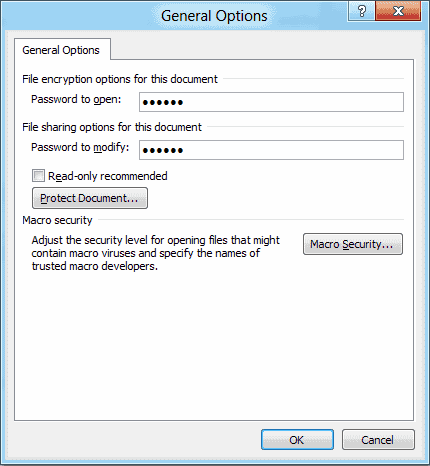
Step 4. Now in the new pop up window, you can add a password for both open or modify the Word document. When you finish adding, press "OK" to get all things done.
Part 2 - How to Lock A Word Document on Web
Currently, Microsoft Word hasn't launched such a password adding function on its web-based platform. So what if people don't want to download software just for adding a password to a Word document for once? Don't worry, there are still other ways you can lock the Word document without using any other apps. This platform - EasePDF - brings the solution to you.
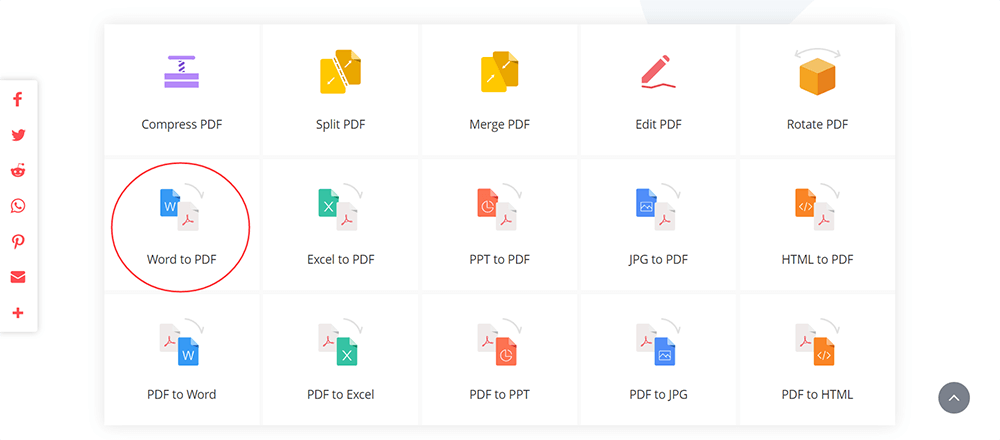
Step 1. Firstly, it would be better for you to convert the Word document to a PDF format. So please go to the Word to PDF converter on EasePDF in this step.
Step 2. Tab the "Add File(s)" button to upload the Word document you need to convert. When you have uploaded, the conversion will begin.
Step 3. Now download the converted PDF document to your desktop.
Step 4. Let's continue. Now on EasePDF, click "All PDF Tools" and select "Protect PDF" from the menu. When you enter the interface of this tool, also press the "Add File(s)" button to add the converted PDF document to the platform.
Step 5. Now you can enter the password to encrypt the document. When you have set it well, click the "Protect PDF" icon.
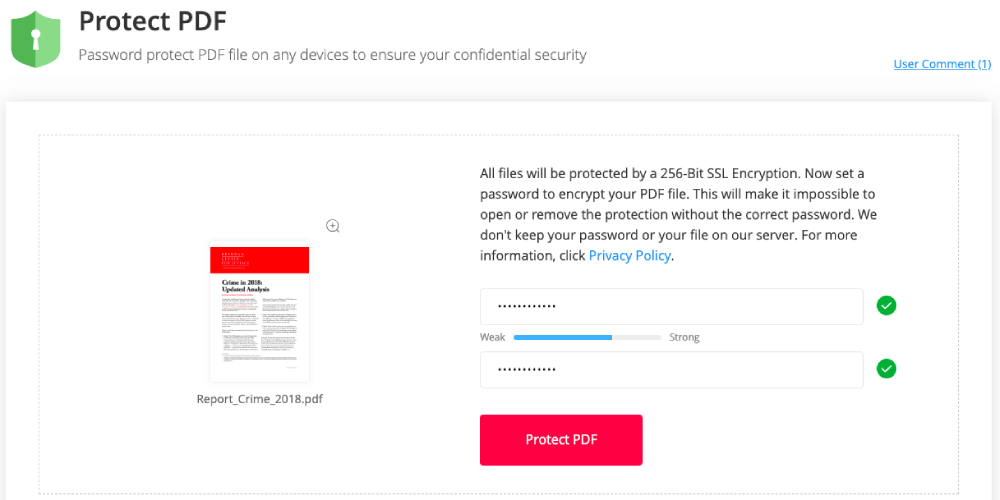
Step 6. When the protected PDF file is ready for download, you only need to press the "Download" icon, then it will be saved offline. You can also save the file to online platforms such as GoogleDrive, Dropbox, and OneDrive. Creating a URL for downloading it later is also available (remember to save it within 24 hours, or it will be deleted).
Conclusion
Both Microsoft Word and EasePDF provide ways for you to password protect the Word document, no matter which version of Word you are using. By adding passwords, your Word documents can safer and you don't need to worry too much about the copyright or other sensitive issues. If you need to do so, turn to this tutorial for help. Thank you!
Was this article helpful? Thank you for your feedback!
YES Or NO


