Looking for a quick solution to convert PDF to PNG? Need to use some pictures in a PDF file yet don't know how to extract them?
We've listed 6 simple solutions for you in this post. You can convert PDF to PNG via EasePDF online converter, Mac Preview, Adobe Photoshop, and extract images from a PDF file and save as PNG format with iLovePDF, Adobe Acrobat Reader and Photoshop. Now let's get started.
Contents
Part 1. How to Convert A PDF to PNG Images 1. Convert PDF to PNG Online with EasePDF 2. Converting PDF to PNG with Mac Preview 3. Change PDF to PNG with Photoshop
Part 2. How to Extract Images from PDF and Save as PNG 1. Extract PDF Images as PNG Online 2. Use Adobe Reader and Microsoft Paint 3. Export PDF Images as PNG with Photoshop
Part 1. How to Convert A PDF File to PNG Images
Method 1. Convert PDF to PNG with EasePDF Online Converter
Online PDF to PNG converter is obviously a smart choice when it comes to cross-platform conversion support. No matter you're on a Mac, Windows, iPhone, or Android device, you can conveniently upload and convert your PDF document to dozens of formats, as long as you have an internet connection.
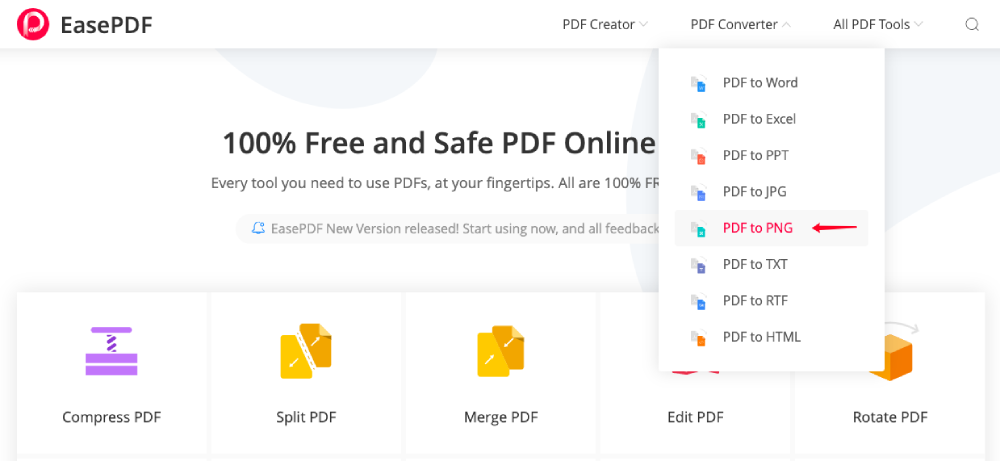
Step 1. Go to EasePDF, put your mouse on "PDF Converter", and select "PDF to PNG".
Step 2. Upload the PDF file you want to convert. There are 3 ways to upload your file.
1. Click "Add File(s)" to select any PDF file.
2. Drag and drop the PDF file from your device to the upload area.
3. Add PDF files from your cloud drives like Google Drive, Dropbox or any other link.

Step 3. EasePDF online converter will automatically convert your PDF file to PNG images after finishing uploading. You'll get the result in seconds if your file is not huge.

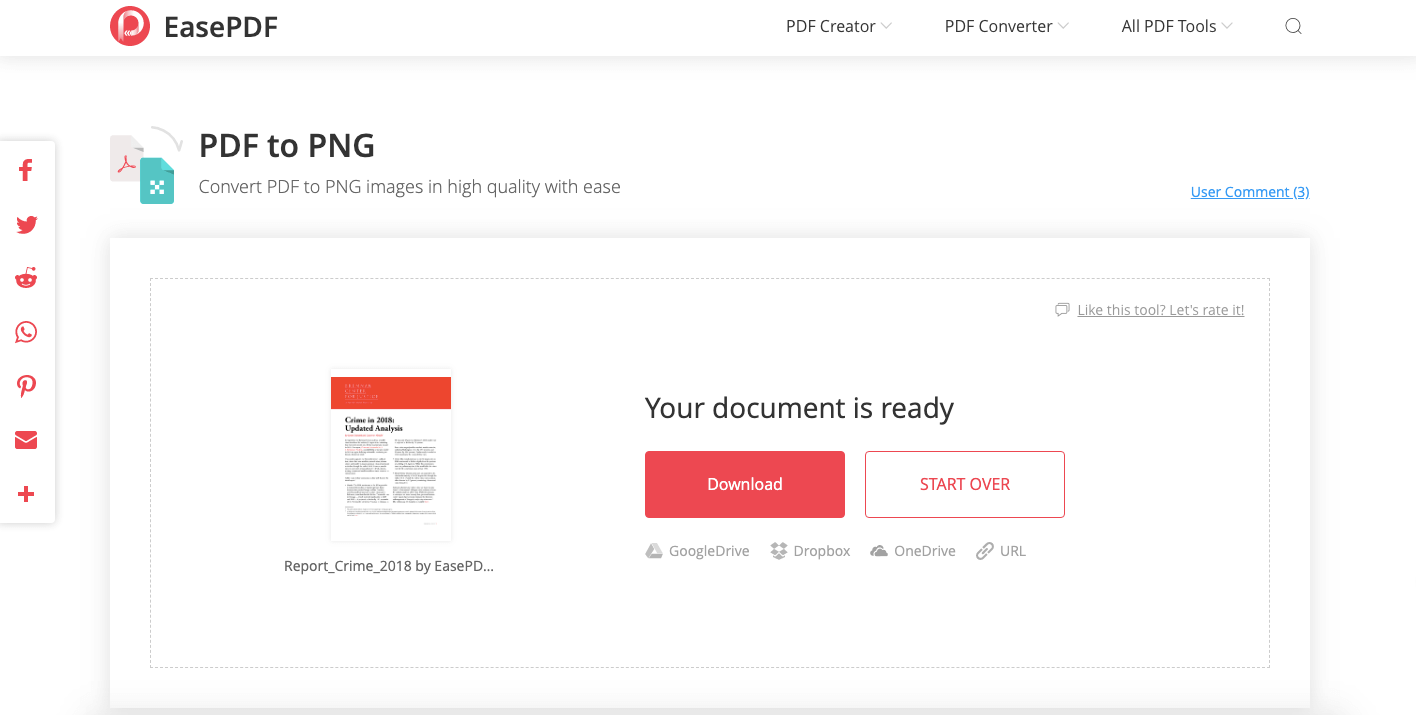
Step 4. When the conversion is done, there will be a download link appearing on the interface. Your converted PNG images will be compressed into a zip file. Now you can click the "Download" button to download the converted PNG images to your local device or save them to your Google Drive, Dropbox or any other cloud drive. You can also share this download link with other people by clicking the "Link" icon. To convert more PDF files to PNG, click the "START OVER" button to start a new task.
Method 2. Converting PDF to PNG with Mac Preview
Converting PDF to PNG with an online converter is very convenient, but what if we don't have an internet connection? For Mac users, you can always rely on a build-in app on Mac call "Preview" to solve this problem.
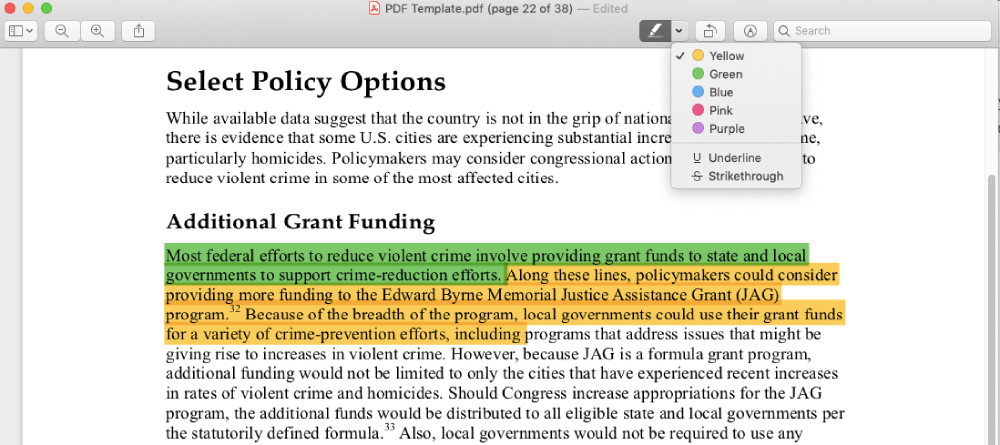
Step 1. Open your PDF file with Mac Preview. Right-click on the PDF file and click "Open with", choose "Preview" from the menu.

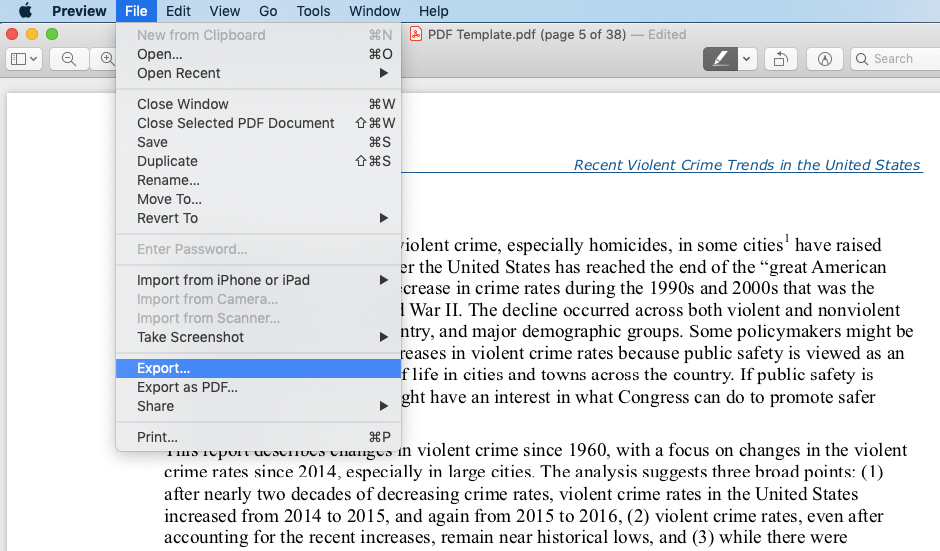
Step 2. Go to the top menu bar, click on the "File" tab and select the "Export" option from the drop-down menu.
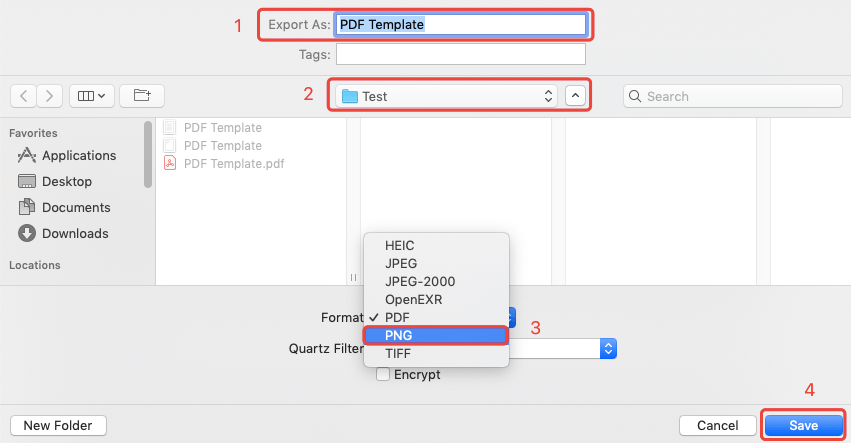
Step 3. A new window will pop up for you to optimize the exporting settings. Firstly, type a file name on the "Export As" box, you can leave it as default as well. Secondly, choose a location to save your converted images. Thirdly, select "PNG" from the "Format" options and set the resolution as you want. Finally, we can click on the "Save" button.
Now your PDF document has been exported to PNG images, go check the converted file on the location you selected.
Note: With Mac Preview, you can do some basic edits before converting to PNG images. The basic editing options including highlight, underline, strikethrough, rotate, and markup.
Method 3. Change PDF to PNG with Photoshop
For windows users, we can't use Mac Preview to convert PDF to PNG. However, we can use Adobe Photoshop as an alternative. For new users, dowload for free trial.
Step 1. Open your PDF file with Adobe Photoshop
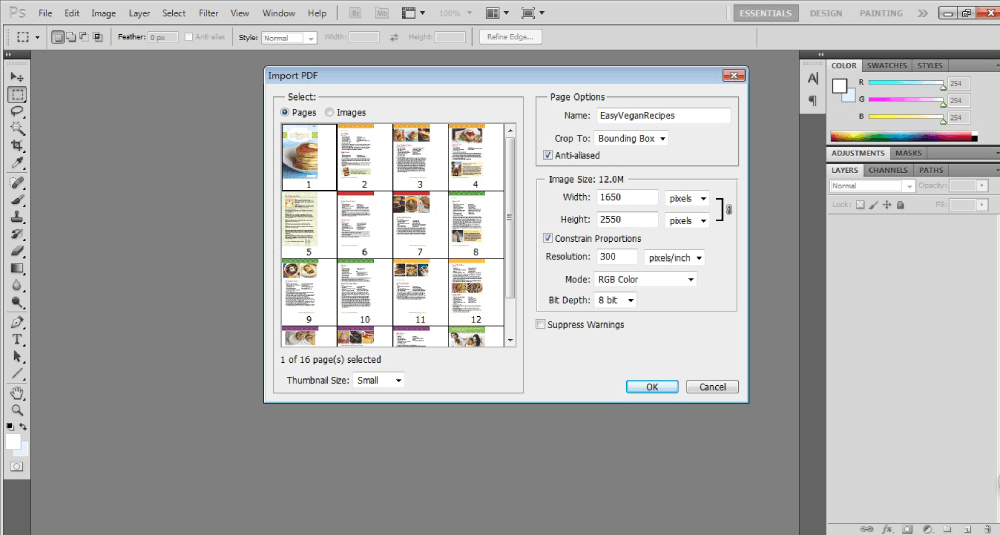
Run Adobe Photoshop on your computer, click the "File" tab on top of the interface, select "Open" to import the PDF file that you want to convert to PNG images.
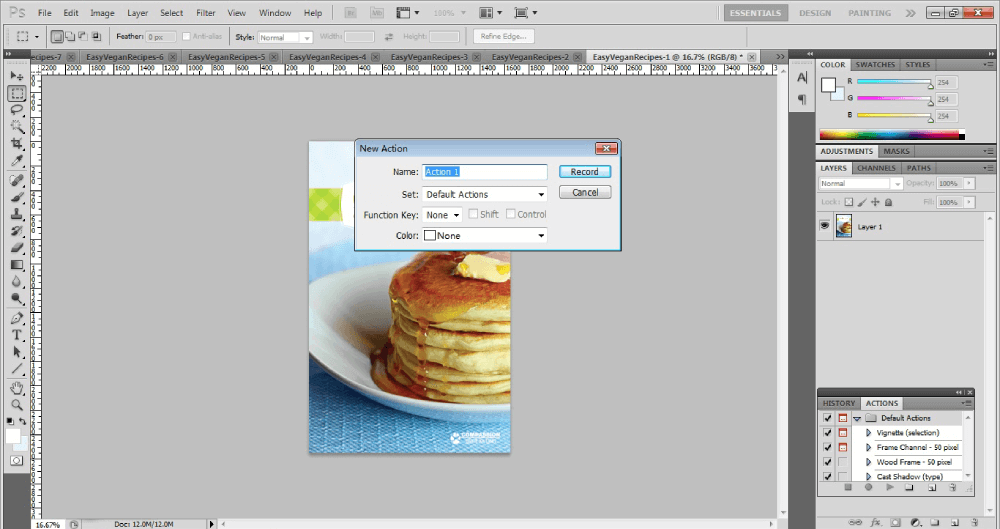
On the "Import PDF" dialog, choose "Pages" and click on the "OK" button to convert pages from PDF. You can select all pages by default, or use the "Ctrl" or "Shift" key to select specified pages. When finishing all the page settings in the right area, click the "OK" button. Your selects pages/images will be imported to Photoshop immediately.
Step 2. Create a "Save as PNG" action record
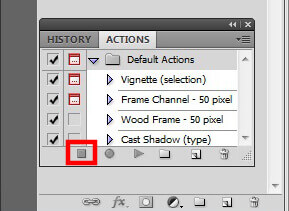
This step is only for multiple pages converting. If you only need to convert one page of PDF to a PNG image, please skip this step. Click on the "Window" tab, select "Actions" on the drop-down menu. Then you'll see an "Actions" window appearing at the right bottom.
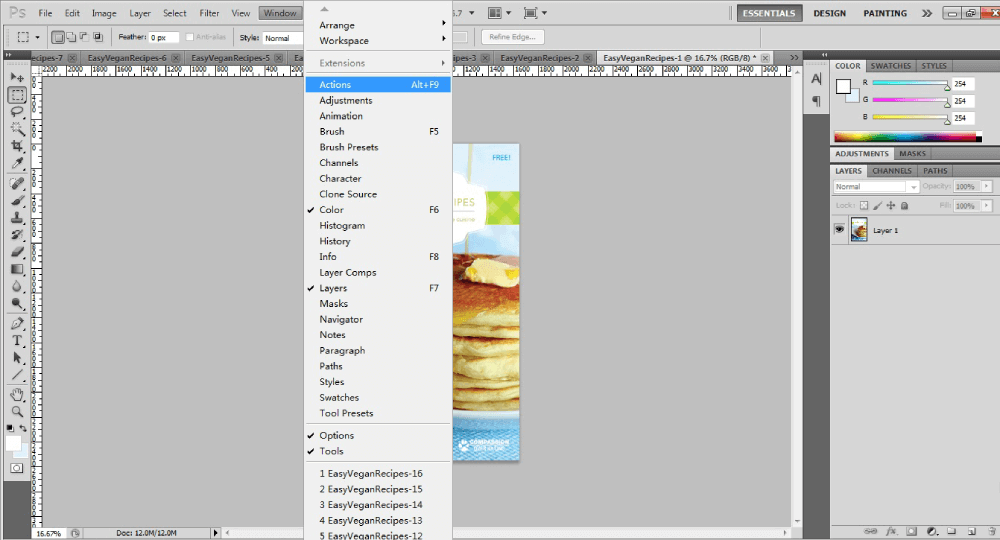
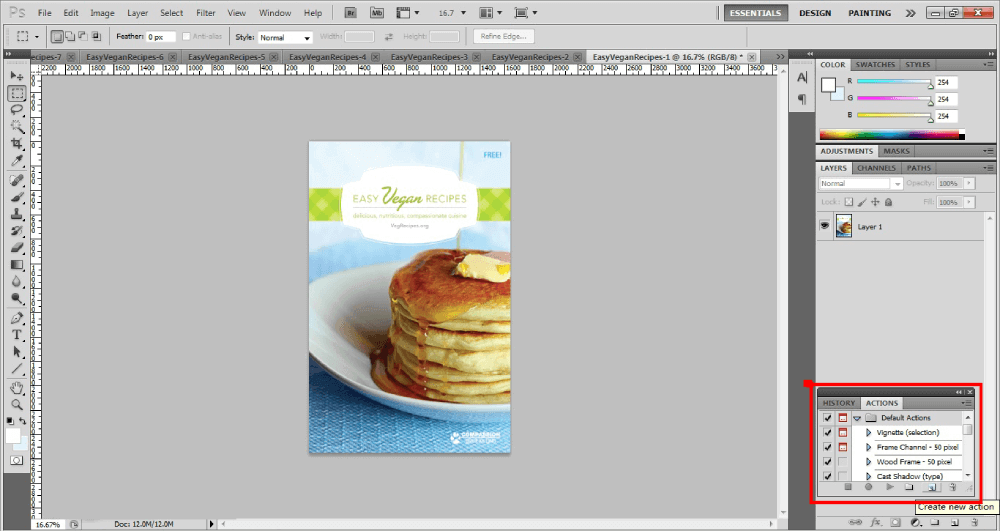
On the "Actions" window, click the "Create new action" tab.
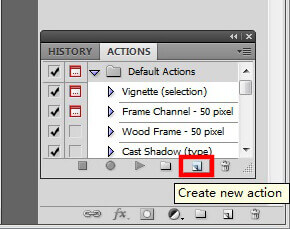
Name this action on the newly opened window, then click "Record".
Step 3. Save a single PDF page as PNG.
Choose "Save as" on the drop-down menu of the "File" option.
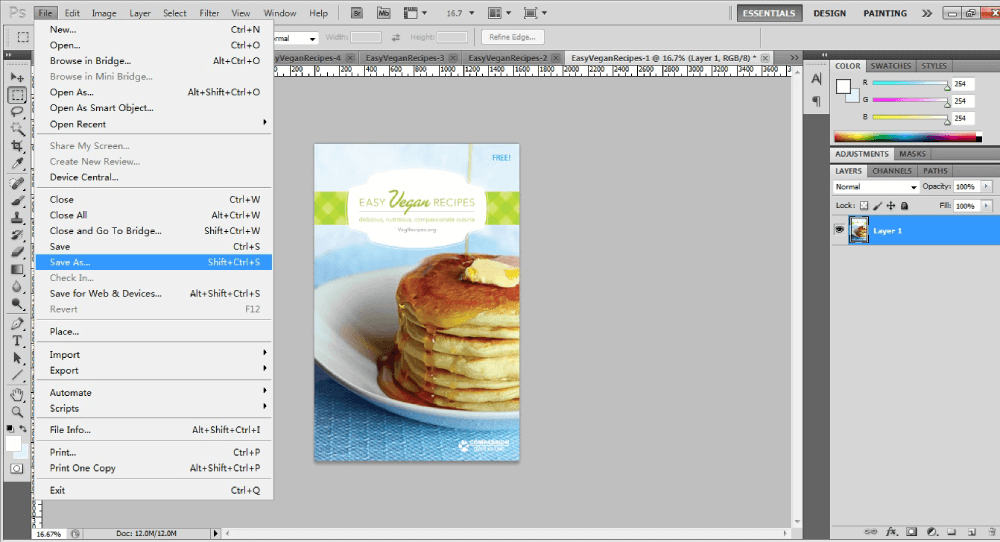
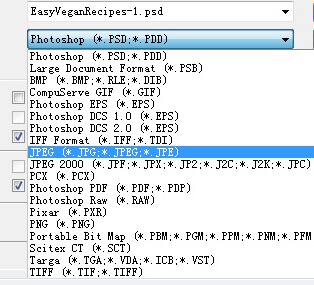
Select the "PNG" format from the drop-down file type list.
Then customize the converted PNG options and click "OK". And this PDF page is now converted to a PNG image. Go to the "Actions" window, click on the "Stop" button to stop the recording.
Step 4. Convert all selected PDF pages to PNG
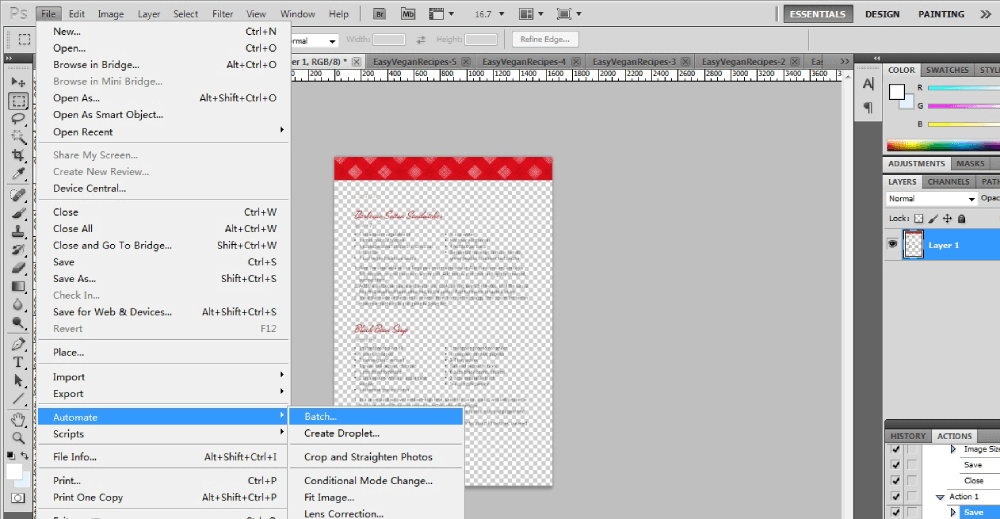
Choose "Automate" from the "File" option, and select "Batch".
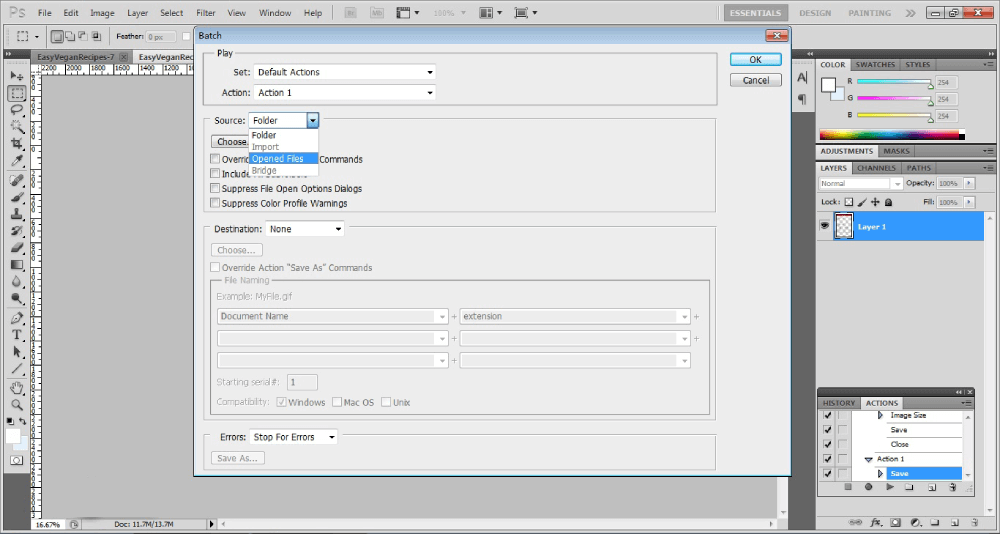
Select the action you create just now, choose "Opened Files" on the "Source" section, and click "OK".
Now Photoshop will start converting all PDF pages into PNG images one by one. When the conversion is done, close all page tabs by the click on the "Close All" option. Converting PDF to PNG with Photoshop is obviously not as simple as using Mac Preview and EasePDF, but it's still a recommended solution especially for those who already have Photoshop installed on their computer.
Part 2. How to Extract Images from PDF and Save as PNG
Method 1. Extract PDF Images as PNG Online
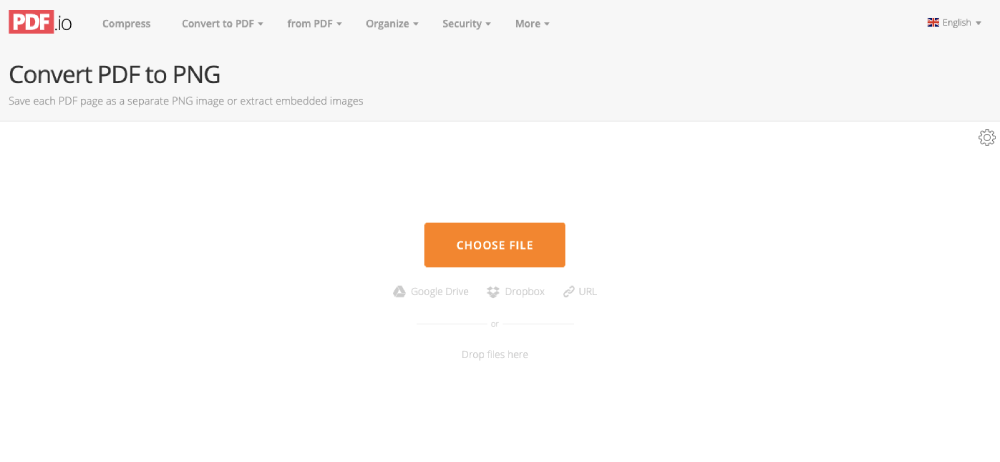
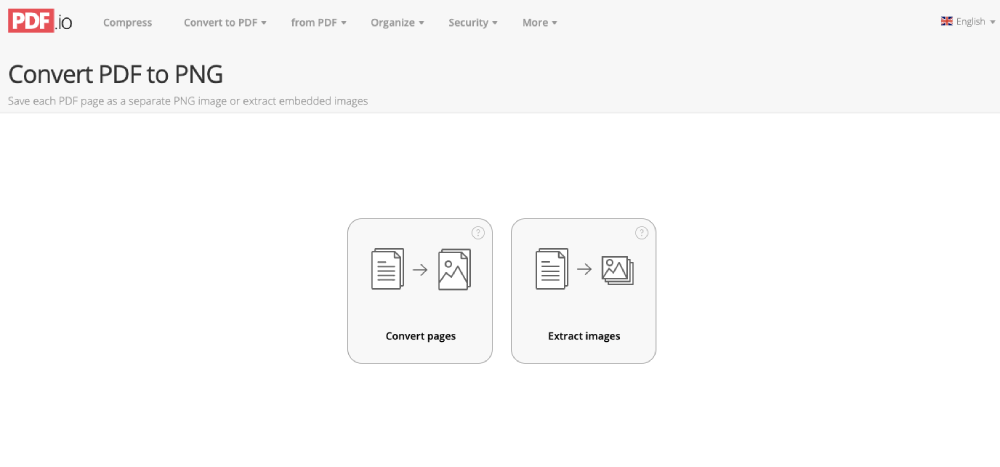
Some online PDF to PNG converters offer users two options to convert pages or extract images, like Pdf.io.
Step 1. Go to pdf.io and choose PDF to PNG Converter.
Step 2. Choose a file to upload. Click the "CHOOSE FILE" button to select the PDF file you want to extract images from your computer. If the PDF file you need to choose is stored on your cloud drive, you can click the "Google Drive" or "Dropbox" link to add your file.
Step 3. After your file is uploaded, a new window will show up and ask you to select the converting mode. Choose the "Extract images" option.
Step 4. Wait for a few seconds. The server will show you a download link when the extracting is done. Click on the "Download" button to save the extracted PNG images to your local device or cloud drive.
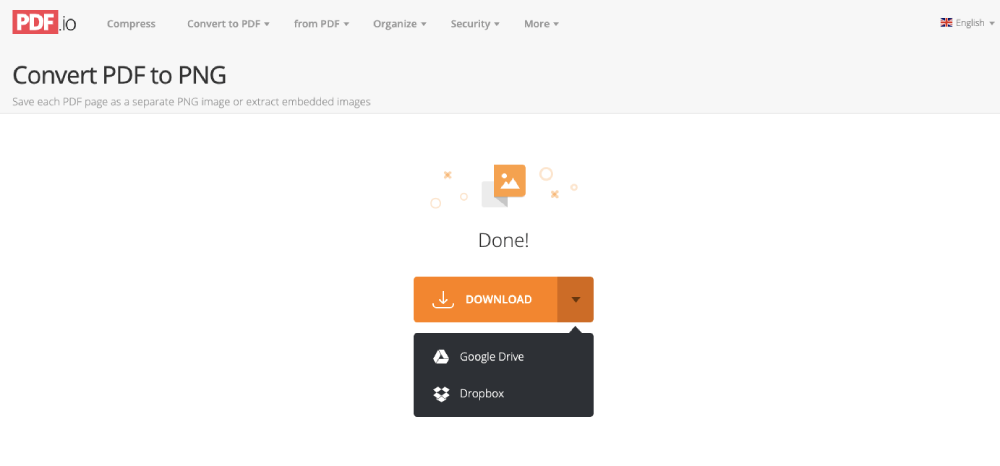
Done! Now you can see all images in your PDF document have been extracted and saved as PNG format.
Method 2. Use Adobe Reader and Microsoft Paint
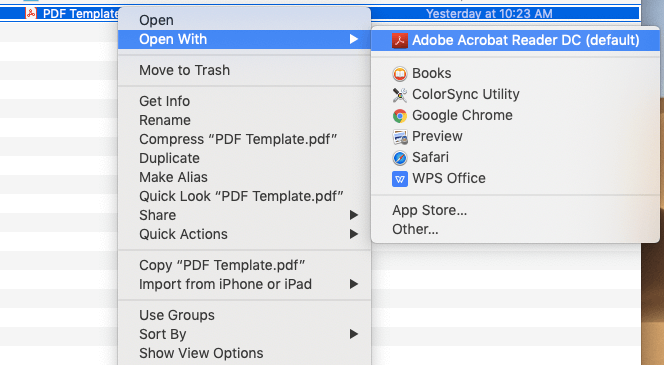
Step 1. Open your PDF file with Adobe Acrobat Reader DC or other PDF reader program.
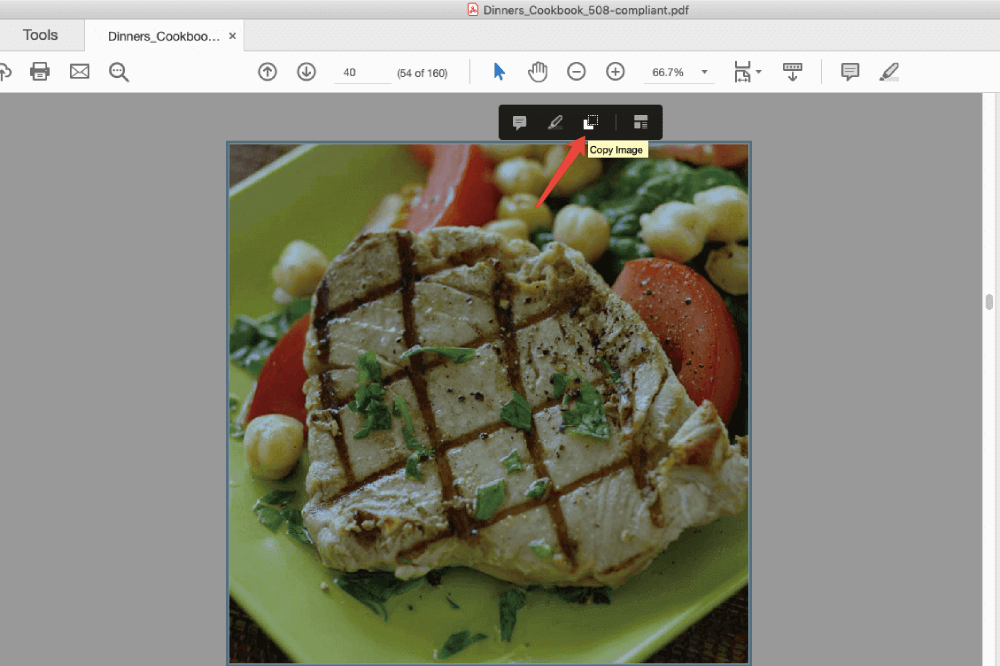
Step 2. Copy the picture you want to extract. Click on any image you would like to extract, and choose "Copy Image" on the top pop-up toolbar.
Step 3. Paste the copied image to Microsoft Paint. For Windows users, you can find Microsoft Paint from the start-up menu. For Mac users and those who don't have Microsoft Paint on their computer, you can use Paint Online. Go to Paint and select "Edit"→"Paste", and you'll see the image shows on the Paint board.
Step 4. Save the image as a PNG format. Go to the "File" menu and choose "Save As", select "PNG" as the output format, and choose a destination to save. The disadvantage of this method is the limitation of extracting only one image from PDF at a time. Therefore we recommend using Adobe Photoshop or online PDF Image Extractor as an alternative for multiple image conversion.
Method 3. Export PDF Images as PNG with Photoshop
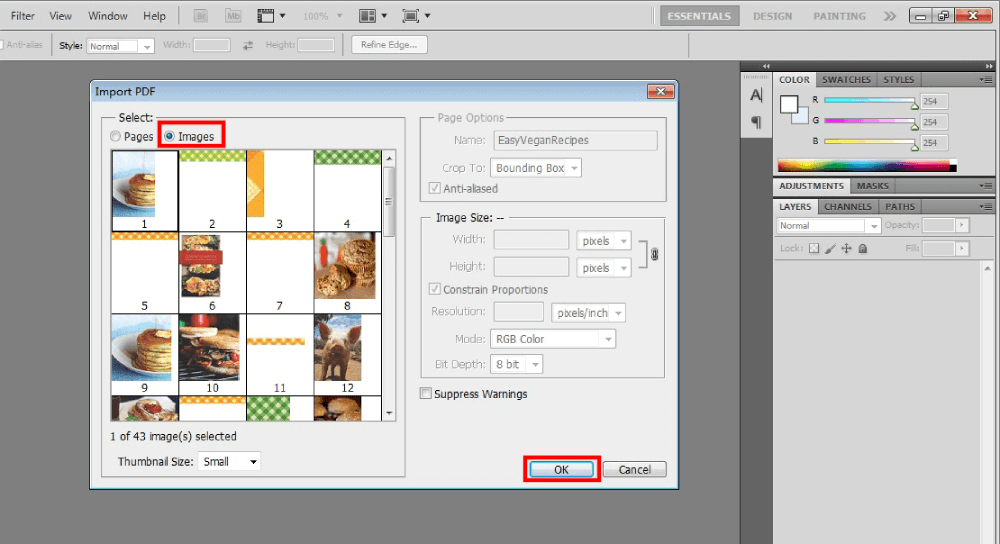
Step 1. Import your PDF images to Photoshop. Run the program and click "File"→"Open" to open your PDF file, the pages and images of the PDF will be displayed as thumbnails on an import window.
Step 2. On the "Import PDF" dialog, remember to tick the "Images" option as your importing mode. Select every image you want to save as PNG format then click on the "OK" button.
Step 3. Save the images as PNG. On the "File" menu, click on the "Save for Web & Devices" option. On the pop-up window, select "PNG-8" or "PNG-24" as the saving format. You can change the image size, color, quality, etc here. After the settings are satisfied, click the "Save" button.
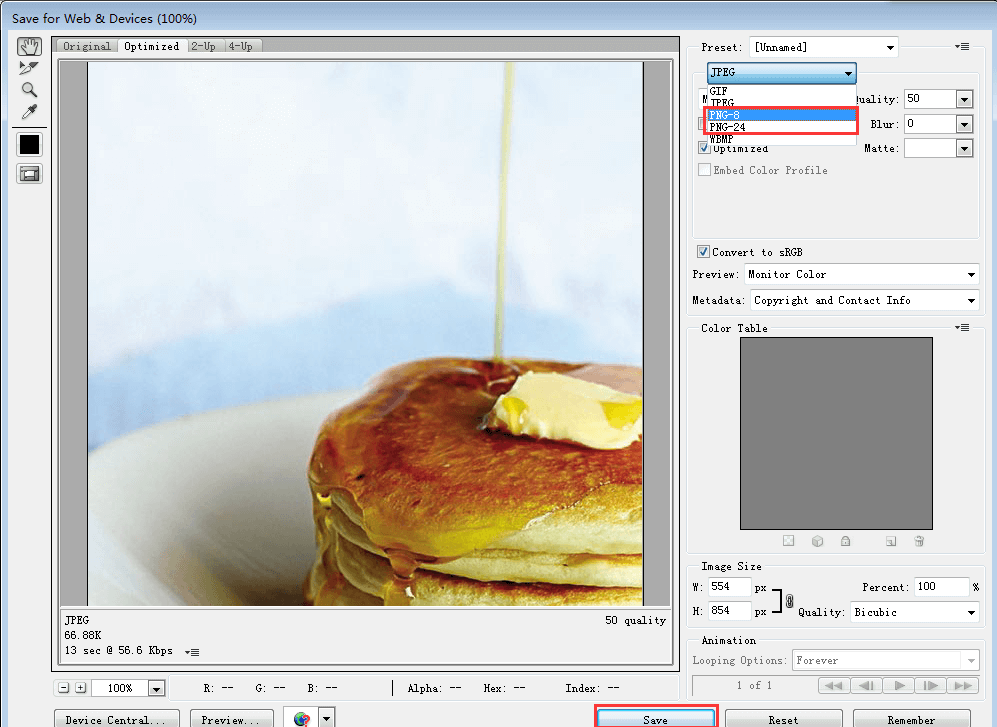
A new window will show up. Fill in a file name and choose a saving location on your computer, then save it. Now you've successfully saved one PDF image as PNG format. What about others? You can convert them one by one repeating step 3, or create a "Save as PNG" action record and then use the batch option to automatically do the job. Please refer to Method 3 of Part 1 to learn how to create an "Action Record" on Photoshop.
Conclusion
We've summarized 6 free solutions for converting PDF pages to PNG images and extracting photos from a PDF file and save as PNG format. Please feel free to write to us or leave a comment if you have awesome ideas for this post or other topics.
Was this article helpful? Thank you for your feedback!
YES Or NO