When you are considering ways to save more space on your Mac computers, reducing the size of PDFs should be one of the options. Normally, PDF presents the best visual effect as they would keep original quality of all content inside the document. Hence, they would take much space than other document formats like TXT or Word. So, how can we reduce PDF size on Mac? Luckily, there are various ways to do. In this blog, we would like to recommend the top 4 ways to help you reduce PDF size manually on Mac without hassle. Follow me and take a read!
Contents
Recommend: Best Tool to Reduce PDF Size Without Losing Quality on Mac
Preview: Reduce PDF File Size Without Third-party Software Installed
ColorSync: A Niche Trick to Reduce PDF Size on Mac
Adobe: Multiple Options to Reduce PDF Size on Mac Professionally
Recommend: Best Tool to Reduce PDF Size Without Losing Quality on Mac
EasePDF makes the PDF compression as simple as a piece of cake on every system, including Mac. What is EasePDF?
EasePDF is a web-based PDF online manager, which offers a variety of PDF tools that enable users to convert, edit, or organize the PDFs online without installing third-party software. By registering an EasePDF account, it allows users to free try the services by providing two free usage chances within every 24 hours without paying a penny. EasePDF works stably and smoothly to process every PDF compression with high efficiency. Thus, using EasePDF to reduce PDF size on Mac would be an ideal option for users who want the quickest and simplest way without using extra software to do.
Features of EasePDF PDF Compressor
- Intuitive interface to reduce PDF size through easy operations;
- Batch conversion feature enables to reduce size of PDFs simultineously;
- Flexible compression levels (1-10) provided to adjust the compress strength accordingly;
- Quick processing speed to complete the compression within seconds;
- Security tech and auto-deletion ensures the data/files safety.
Now, simply follow the easy steps guided here to reduce PDF size on Mac via the help of EasePDF Online PDF Compressor.
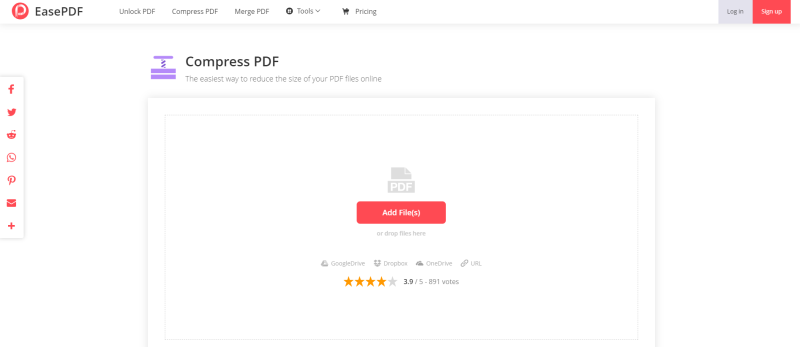
STEP 1. After opening EasePDF in web browser, you can easily find the "Compress PDF" tool on the navigation bar. Enter the tool for importing the PDFs you need to reduce the size of.
NOTE: You are available to login to your Google Drive, Dropbox, or OneDrive account for adding files from these cloud libraries.
STEP 2. When the PDFs are imported, you are able to select a compression level for reducing the size of the files according to your need. The compression level ranges from 1 to 10, and level 5 is the recommended option for it can reduce comparatively larger size but retain nice visual quality.
STEP 3. When you decide the compression level, simply hit the "Compress PDF" to start the PDF compression.

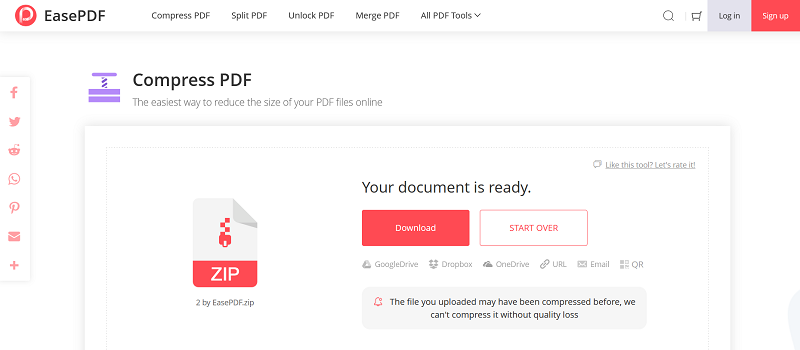
STEP 4. As the compression completed, you will see the "Download" icon provided for preserving the compressed PDF file locally. Hit it and you can gain the file with smaller size on your Mac.
NOTE: Meanwhile, you can back up the files to back to your Google Drive, Dropbox, or OneDrive libraries or share it through email, URL, or QR code (will be expired after 24 hours).
Preview: Reduce PDF File Size Without Third-party Software Installed
Getting sick of searching for a third-party tool to reduce PDF size on Mac? Here is a built-in method provided by Apple. Preview is a pre-installed software used for reading PDF files with nice experience. Actually, it has the hidden feature that allows you to reduce PDF file size freely. This way is recommended to you here.
NOTE: The compression may have reduction on your PDF quality as well.
STEP 1. Select the PDF file you need to compress its size on Mac. Then open the file via Preview app.
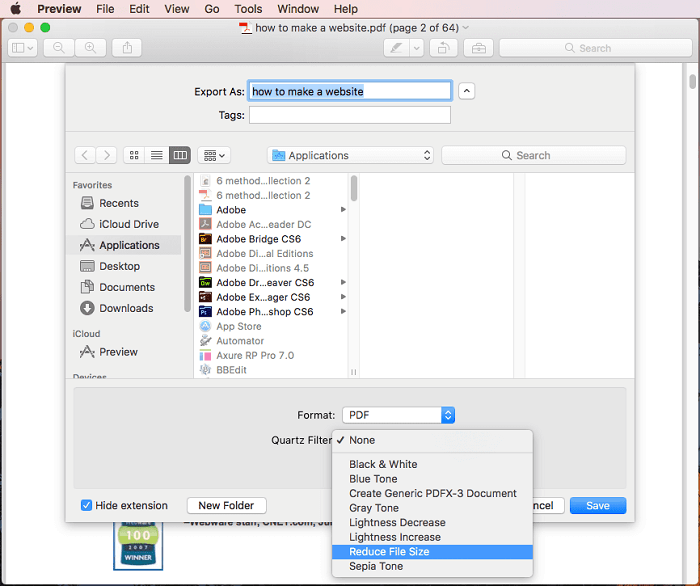
STEP 2. Go to "File" on the toolbar of the Mac screen. From the drop-down menu list, choose "Export".
NOTE: You should choose "Export" instead of "Export as PDF".
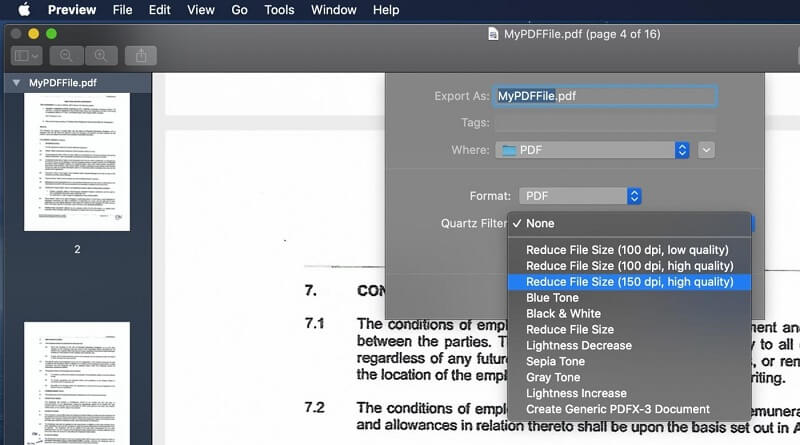
STEP 3. When the pop-up window appears, you should hit "Quartz Filter" icon for selecting the "Reduce File Size" option to reduce size of PDF directly on Mac.
The compression will be completed by Preview automatically. Compared with the way to use EasePDF to reduce PDF size manually in selected compression level, the drawback of Preview should be its failure in controlling the compression proportion. Also, as mentioned, Preview would leave the visual quality, especially the image quality in the PDF to be greatly compressed. Thus, if you prefer to reduce PDF size without losing quality or bring selectable option while reducing PDF file size in Preview, you should not miss the next part.
ColorSync: A Niche Trick to Reduce PDF Size Without Losing Quality on Mac
Another comparatively niche method to reduce PDF size without losing quality on Mac is to make pre-settings the ColorSync, another built-in app for macOS system. A few people realize that this app can help as it looks like a software to deal with image or photo colors. But don't forget that PDF is also a type of document format that has requirements in delivering content with high-quality color elements. Thus, the file size reduction feature provided inside ColorSync can also be employed to maintain good quality and set selectable quality while reducing size of PDFs. Let's see how now.
STEP 1. Open ColorSync Utility by going to "Applications" > "Utilities" on your Mac computer.
STEP 2. Switch to "Filters" and scroll down to find "Reduce File Size" in the list.
STEP 3. After clicking on the "Reduce File Size" and you can make more pre-settings before reducing the size of the PDF. As we can see, the default setting of "Constrain Size" is set to be 512 pixels at max, which can explain why the quality of the PDF would become poorer after using Preview to reduce PDF size.
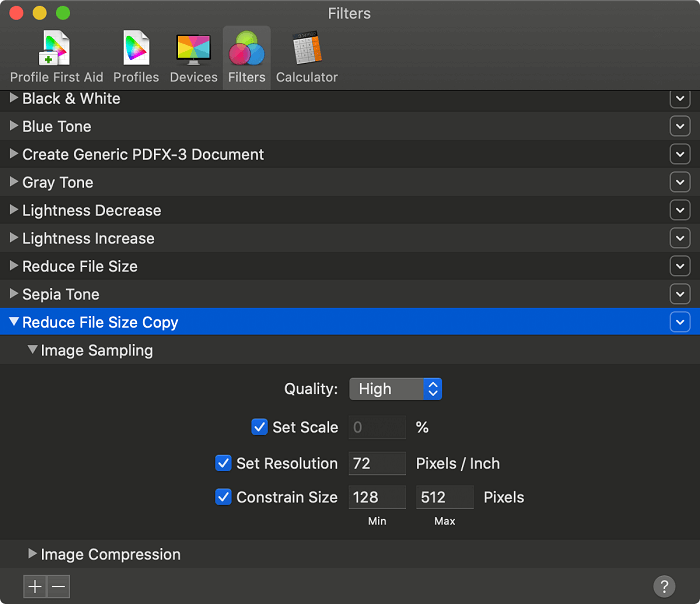
Now you need to make a copy of this filter setting. Simply hit the down arrow on the right side of "Reduce File Size" for choosing "Duplicate Filter", which will help create the "Reduce File Size Copy" at the bottom of this list. You can make several copies based on your requirements.
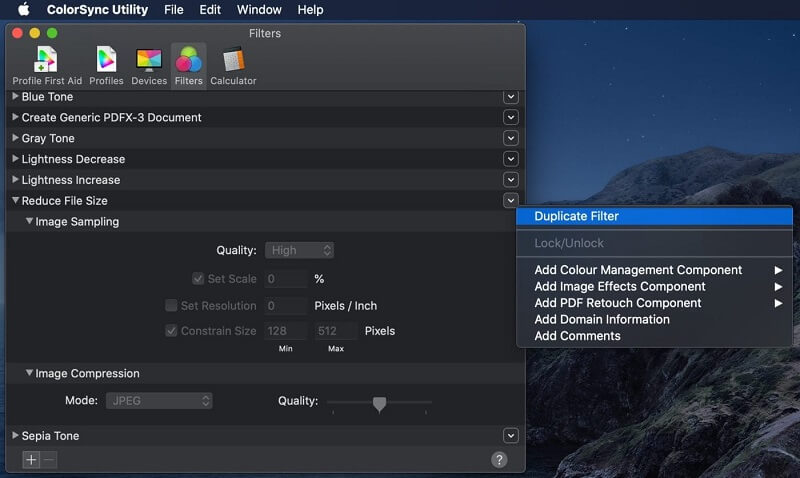
STEP 4. In each new created filter, you can rename them and change the quality settings. When you have created them, the options will be showed up in the "Quartz Filter" drop-down menu of Preview app. So next time when you reduce PDF size in Preview, you can select the quality instead of letting the app to auto-compress for you.
Adobe: Multiple Options to Reduce PDF Size on Mac Professionally
As we know, Adobe Acrobat is a professional PDF editor for desktop users. If you also have installed this software on your Mac, luckily, you get several options to reduce PDF size!
Option 1. Re-save PDF
When we complete editing PDF, we would probably click "Save" to apply the changes directly. Although this would be a faster way, it would not rewrite the file so lots of info would be added up. But by using the "Save As" feature, the saved PDF would be rewritten to remove some additional changes, thus the size of PDF would be reduced to a smaller one.
Option 2. Clear Unused Space
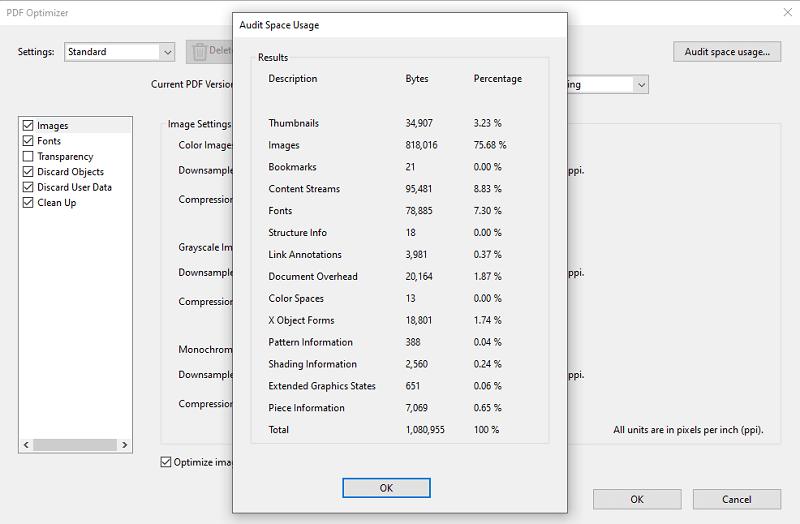
You may neglect the unused space created in your PDF content, and this could be the reason for the increase of your PDF file size. To remove the unused space from your PDF, simple go to "Tools" > "Advanced Optimization" > "PDF Optimizer" and select the "Audit space usage..." icon on the top-right corner. Then the unused space will be deleted and you can successfully reduze PDF size.
Option 3. Delete Unneeded Objects
Likewise, the size of a PDF file may be accumulated from the texts, links, images, bookmarks, forms, or JavaScript added to the content. When you don't need some objects in your PDF file, delete them will be the most efficient way to reduce PDF size on Mac. This can also be done in Adobe Acrobat easily.
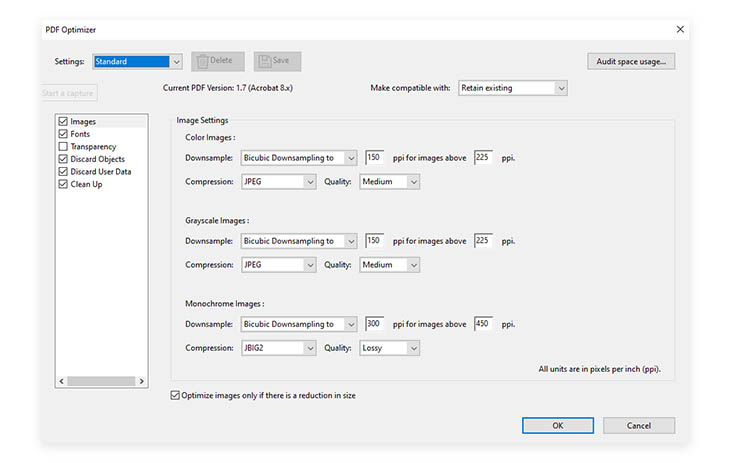
STEP 1. After opening the PDF file in Adobe Acrobat, go to "File" > "Save as other" > "Optimized PDF".
STEP 2. In the "PDF Optimizer" window, you can tick the objects on the left column for selecting to remove them.
STEP 3. Hit the "OK" icon after the remove selection, then your PDF file size can be reduced on Mac easily.
Option 4. Replace CMYK Color with RGB
Very few people could notice that the usage of CMYK colors would increase the size of the PDF. By replacing them with RGB colors, the file size can be reduced efficiently.
STEP 1. Open the PDF you need to reduce PDF size on Mac using Adobe Acrobat.
STEP 2. You should go to "Tools" > "Print Production" > "Convert Colors" in Adobe Acrobat software on Mac.
STEP 3. In the "Color Spaces" section, which is on the right side in the pop-up window, choose "RGB color space".
STEP 4. Then move to the middle column for selecting "FOGRA39 profile" in "Conversion Profile", which is the standard option in print industry, then apply to "All" pages and submit "OK".

After the colors are replaced to RGB, you can check the size of your PDF file, which will be reduced to a smaller one immediately.
As we can see, there are multiple ways we use to reduce PDF size on Mac easily. If you are an Adobe Acrobat user, then you are able to apply more than one option to reduce PDF file size with very simple clicks. If you haven't installed Adobe Acrobat yet, the online PDF compressor and built-in Preview app can be your backup options. Just pick the most convenient way to reduce PDF size on Mac efficiently!
Was this article helpful? Thank you for your feedback!
YES Or NO